Water Pressure Reducing Valve Installation

How To Install A Pressure Reducing Valve And Adjust Water Pressure Installation Plumbing Home Repair

Z Tide Group Ztidevalve Twitter Our Stainlesssteel Direct Acting Pressure Reducing Regulator Valves May Installed In Vertic Installation Tide Hydrant

Z Tide Group Ztidevalve Twitter Pressure Reducing Valve Installed Under Outdoor Environment Pr Fire Protection System Fire Protection Installation

Pressure Reducing Valves In Water Work Application Philippines Pressure Control Valve Control Valves Valve

Water Pressure Reducing Valve Valve Pressure Plumbing Valves

Water Tank Installation Water Storage Tanks Water Storage Domestic Water Pumps

Take the water pressure reducing valve and attach it to the fittings.
Water pressure reducing valve installation.

Booster Pump Explain New 2017 Youtube Water Pressure Pump Refrigeration And Air Conditioning Plumbing Tank

Wood Stove Hot Water Google Search Hot Water Home Maintenance Distillation

Pin En Green Business Tips

Piston Design Pilot Operate Pressure Reducing Valve In Fire Protection Pressure Control Valve Fire Protection Sprinkler System

Solenoid Valve On Water Supply Application Which Installed Vertically Compact Design Feature Allows Installer Pressure Control Valve Water Supply Installation

Pressure Reducing Valve Set Model Rs 201 H Built With Strainer And Bypass Line Providing Easy Maintenance And Sav Pressure Control Valve Control Valves Valve
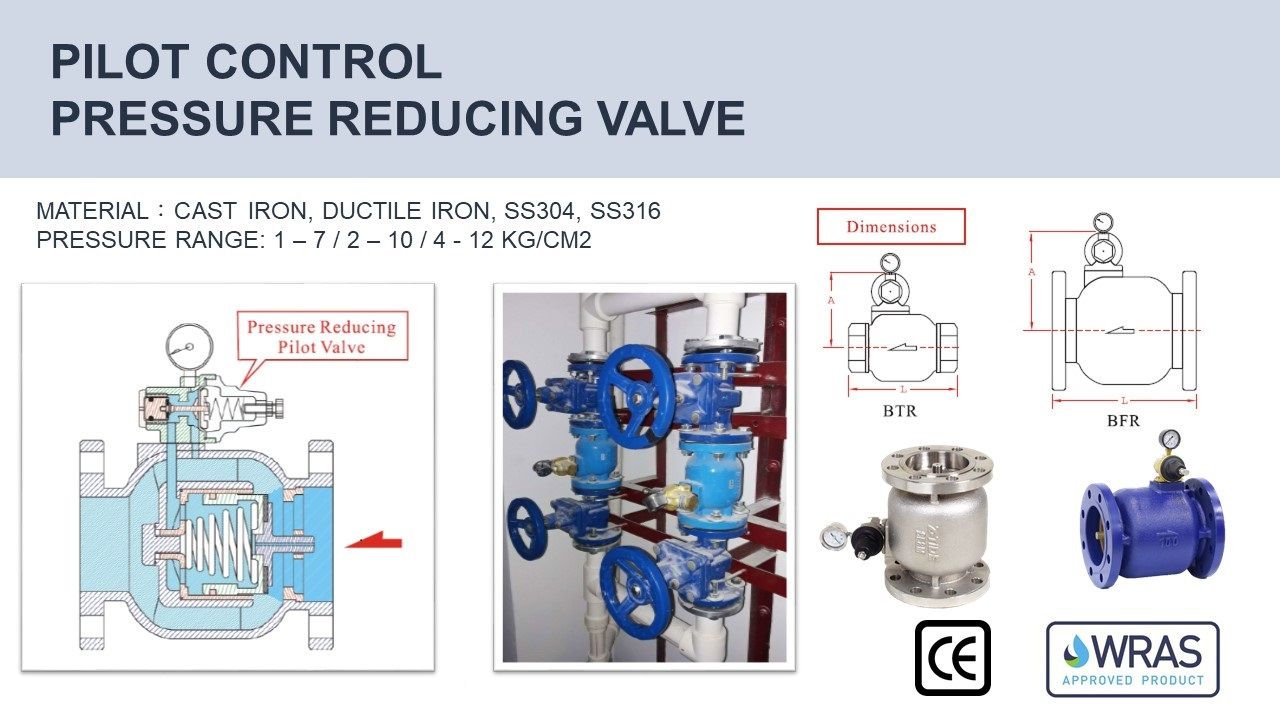
Pilot Control Pressure Reducing Valve Pressure Control Valve Control Valves Valve

Water Pressure Reducing Valves Water Conservation Learn About Watts Canada Water Conservation Valve Water Pipes

Pressure Regulators Pressure Control Valve Control Valves Valve

Low Water Pressure In Your House The Problem May Be The Pressure Reducing Valve In Your Yard We Dug This O Plumbing Pressure Control Valve Low Water Pressure
The Main Role Of The Pressure Reducing Valve Engineering Hydraulic Systems Mechanical Engineering

1 5 Inch Pressure Reducing Regulator Valve On Hydrant Pipeline Bangladesh Pressure Control Valve Control Valves Valve

Z Tide Group Ztidevalve Twitter Pressure Reducing Valve Built On A Mining Pressure Reducing Station Pressu Pressure Control Valve Control Valves Valve

Z Tide Group Ztidevalve Twitter Piston Design No Outer Conduit Pressure Reducing Valve Regulator Ins Pressure Control Valve Fire Protection Valve

Hi The Water Pressure In My Home Is Low And I Have Started Searching For A Decent Water Booster System Water Pressure Pump Water Filter Diy Shallow Well Pump

Electric Boiler For Forced Hot Water Heat System Google Search

Ss304 Water Hammer Arrester In Industrial Application Bangladesh Pressure Control Valve Control Valves Industrial

Float Valve Groove Type Stainless Steel Pressure Control Valve Control Valves Valve
Https Encrypted Tbn0 Gstatic Com Images Q Tbn 3aand9gctcevi0vbfl6 Iyivez3ymaatan35ejne3ytyuparhffwjhrbkj Usqp Cau

Valvula A Solenoide Pressure Control Valve Control Valves Valve

How To Inspect And Fix Your Own Gas Fired Boiler Gas Boiler Water Boiler Water Heating Systems

Valvula Flotador Flutacao Pressure Control Valve Control Valves Valve

Pump Control Valve Prevent Water Hammer Effect Equivalence To Combination Of Pump S Variable Drive Check Valve Pressure Control Valve Control Valves Valve

Brass Dn20 3 4 Water Pressure Regulator Valve And Pressure Gauge Pressure Retaining Valve Water Pressure Reducing Valve Pressure Gauge Valve Gauges
Source : pinterest.com
